Densetsu no Starfy 2/Test Stage-1
Only in Japan!
| |

|
Gomen'nasai! This article is related to a game, manga series or other media that has not been released outside Japan. The coverage here may differ from what it would be in an official translation. |
This article's title is a fan name.
| |

|
An official name for the article's subject has not been found, so it uses a non-official name at Densetsu no Starfy 2/Test Stage-1. If you know an official name, please request the page to be moved at Category talk:Articles with conjectural names. |
Not to be confused with Test Stage-1 from Densetsu no Starfy 3.
Test Stage-1 is the first area in Densetsu no Starfy 2's Test Stage. It contains 10 maps, though 3 of them are inaccessible. It should be noted that attempting to Pause in any of these maps will make the game hang at a black screen, likely due to issues with creating suspend save data or invalid local pause menu text. All maps play the music from Lobber's Cave, even in map 10, which has a boss fight.
The map data for all three area of Densetsu no Starfy 2's Test Stage appear to be adjacent to each other internally, separated by one blank map. So, attempting to load "map 12" in Test Stage-1 will actually load map 1 in Test Stage-2. Map 13 will load map 2 in Test-Stage 2, and so on. The game does not allow loading map numbers above 16.
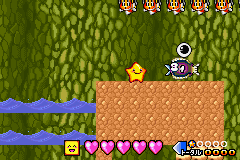
Map 1
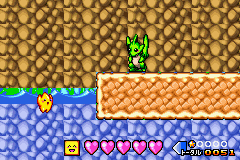
Map 1 consists of an open area with a mermaid and breakable blocks to the right. Starfy spawns on a platform with a Flatfish as well as six Kit Fish floating in the air. Talking to the Flatfish appears to trigger a conversation with Moe, though the dialogue does not appear to correspond with the test messages found in the game. Talking to any of the Kit Fish positions Starfy as if he were talking with the Flatfish and starts the same conversation.
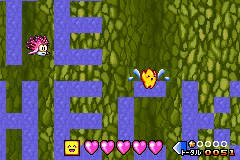
Map 2
Map 2 consists of floating water tiles that spell out "DATE CHECK PRESS L+R". There is a pink creature that cannot be interacted with. Pressing L and R at the same time on this map causes the text "2003/08/04 20" to appear in the top-left corner.
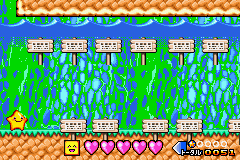
Map 3
Map 3 features many signboards. Each signboard demonstrate one of Starfy's abilities or vehicles. Note that some of the signs are one tile deep into the ground. Reading these signs puts Starfy at the base of the sign, glitching him one tile into the ground.
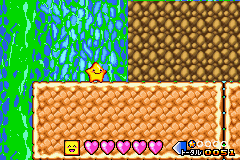
Map 4
Map 4 consists of some rectangular land, water, and enemies.
Map 5
Map 5 has Ryun and some more enemies. Some Seal Blocks can be seen in this map.
Map 6
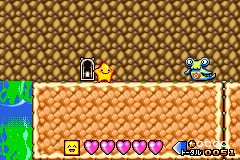
Map 6 contains a very peculiar green monster. Its initial appearance appears to be that of an unused NPC. Pressing up or down on the D-Pad causes this monster's appearance to shuffle through various cutscene-related and in-game objects. Regardless of this monster's appearance, Starfy cannot interact with it in any way. There is also a door, though entering it just leads to a black screen.
Maps 7-9
Attempting to load maps 7-9 normally causes the game to hang at a black screen. This is because, internally, these maps lack an object to set an initial spawn point for Starfy. Each of these maps was programmed to contain just a single Unu.
Map 10
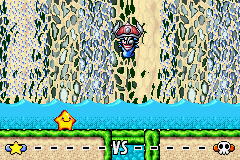
Map 10 puts Starfy into a boss fight with Puchi Ogura 10. Defeating the boss appears to unlock the Chonmage Wig, the same treasure unlocked by beating Puchi Ogura 10 for the first time.
Gallery
Map 1
Map 2
Map 3
Map 4
Map 5
Map 6
Map 10


| List of prerelease information | Densetsu no Starfy • Densetsu no Starfy 2 • Densetsu no Starfy 3 • Densetsu no Starfy 4 • The Legendary Starfy |
|---|---|
| Lists of unused content | Densetsu no Starfy • Densetsu no Starfy 2 (test stage) • Densetsu no Starfy 3 (test stage) • Densetsu no Starfy 4 (test stage, unused models) • The Legendary Starfy (Helpful Stuff, test stage) • Test Stages (general information) |
| Unreleased games | Unused balloon/bubble pushing games / Densetsu no Starfy (Game Boy/Color) |
| Events and TV shows | Nintendo Space World (2000, 2001) • World Hobby Fair (2002, 2006) • Oha Suta • E3 (2009) |
| Media with relevant information | Game Boy Encyclopedia • Gekkan Nintendo • Nintendo Dream • Nintendo Power • Nintendo Spaceworld Official Guidebooks • Websites |