Densetsu no Starfy 2/Test Stage-2
Only in Japan!
| |

|
Gomen'nasai! This article is related to a game, manga series or other media that has not been released outside Japan. The coverage here may differ from what it would be in an official translation. |
This article's title is a fan name.
| |

|
An official name for the article's subject has not been found, so it uses a non-official name at Densetsu no Starfy 2/Test Stage-2. If you know an official name, please request the page to be moved at Category talk:Articles with conjectural names. |
Not to be confused with Test Stage-2 from Densetsu no Starfy 3.
Test Stage-2 is the second area in Densetsu no Starfy 2s Test Stage. It contains 7 maps. These maps showcase vehicle demonstrations as well as some boss battles. Each boss battle (maps 5-7) plays music from Lobber's Cave.
Map 1
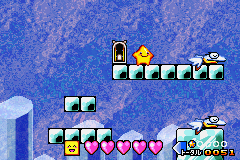
Map 1 appears to resemble a location in Slippery Iceberg, with matching music and slippery terrain. There are two Sukebon and some lava platforms to ride them on. There appear to be no enemies. There is a wide gap that cannot be traversed without the upgraded Sukebon. Nevertheless, riding the Sukebon all the way to the right simply takes Starfy to a dead end. At the start of the map is a door, which, when entered, takes Starfy to map 2.
Map 2
Map 2 appears to resemble a location in Gluglug Lagoon, with matching music and identical-looking terrain. There are two Balloons, which are required to navigate the map vertically. The left side of the map contains a maze of spikes while the right side contains some floating square-shaped terrain. There appear to be no enemies in this map. At the start of the map is a door that takes Starfy to map 3.
Map 3
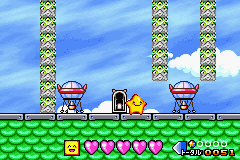
Map 3 appears to resemble a location in Pufftop, with matching music and identical-looking terrain. There are two Ryun, which are required to fly across the spikes to the right. There are a few Mejiro along the way. Riding Ryun all the way to the right just leads to a dead end. At the start of the map is a door that takes Starfy to map 4.
Map 4
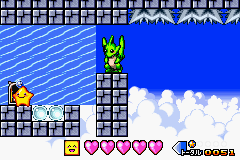
Map 4 appears to resemble a location in Resshi Lake, with matching music and identical-looking terrain. There are some floating background tiles, as well as invisible water tiles. There are two Kigurumi, which, when equipped, spawn a Liftwisp and a Lurchin. Both the Liftwisp and the Lurchin can be used to take Starfy to some floating platforms, though they are just dead ends. Falling down the hole to the right, with or without the Kigurumi, will leave Starfy unable to climb back up. At the start of the level is a door that takes Starfy to map 1, completing a loop between maps 1-4.
Map 5
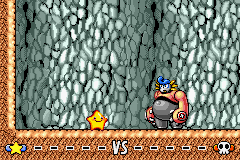
Map 5 puts Starfy into a boss fight with Puchi Ogura 5 and Numan. Defeating Puchi Ogura 5 appears to unlock the Jersey, the same treasure awarded when beating Puchi Ogura 5 for the first time.
Map 6
Map 6 puts Starfy into a boss fight with Puchi Ogura 6. Defeating Puchi Ogura 6 appears to unlock the Robo Kigurumi, the same treasure awarded when beating Puchi Ogura 6 for the first time.
Map 7
Map 7 puts Starfy into a boss fight with Puchi Ogura 7. Defeating Puchi Ogura 7 appears to unlock the Hairband, the same treasure awarded when beating Puchi Ogura 7 for the first time.
Gallery
Map 1
Map 2
Map 3

Map 4

Map 5
Map 6

Map 7


| List of prerelease information | Densetsu no Starfy • Densetsu no Starfy 2 • Densetsu no Starfy 3 • Densetsu no Starfy 4 • The Legendary Starfy |
|---|---|
| Lists of unused content | Densetsu no Starfy • Densetsu no Starfy 2 (test stage) • Densetsu no Starfy 3 (test stage) • Densetsu no Starfy 4 (test stage, unused models) • The Legendary Starfy (Helpful Stuff, test stage) • Test Stages (general information) |
| Unreleased games | Unused balloon/bubble pushing games / Densetsu no Starfy (Game Boy/Color) |
| Events and TV shows | Nintendo Space World (2000, 2001) • World Hobby Fair (2002, 2006) • Oha Suta • E3 (2009) |
| Media with relevant information | Game Boy Encyclopedia • Gekkan Nintendo • Nintendo Dream • Nintendo Power • Nintendo Spaceworld Official Guidebooks • Websites |